Out & About with Elizabeth

Today I am

at

...celebrating Family, Friendship and Facebook fans!!
CLICK HERE FOR COMPLETE DETAILS AND INSTRUCTIONS. 
(Psst, there is also a fabulous giveaway taking place!)
(entry deadline: Saturday, 5/31, at 11:59 PM PST)


Radiant Neon, 8 of 8: Elizabeth

Put on those sunglasses...as we dream of the bright sun and warm temps of summer, we're going bold and bright in the Studio with Tsukineko's Radiant Neon Inks.  Join us over the next several weeks as we share eight projects featuring these incredible inks with fun techniques and happy color combos!
Additional Imagine Crafts / Tsukineko Inspiration on their FACEBOOK PAGE

Last, but not least, Radiant Neon inks are superb for direct-to-stamp inking.  The coverage is outstanding.
Penny Black’s “Petal Power” was the perfect set to illustrate how beautifully silhouette images work with these inks.  
The flowers were stamped in Electric Pink, Electric Coral and Electric Yellow Radiant Neon.  Electric Green was used for the leaves.  Extra highlighting was created with a Brushstix.  The trimmed flowers were attached to an elevated panel with dimensional foam tape.

The beautiful sentiment was stamped in Onyx Black VersaFine.  A die cut border (Dots & Swirls) paired with a strip of red cardstock added a simple accent without detracting from the main focus of the card.

[Supplies: Tsukineko/Imagine Crafts: Electric Coral Radiant Neon, Electric Pink, Electric Green Radiant Neon, Electric Yellow Radiant Neon, Onyx Black VersaFine, Brushstix; Penny Black: 01-001 Storm, 16-003 Fall Festival Mix & Match Cardstock, Petal Power 30-225, Friendship Flowers 30-223, Dots & Swirls Creative Die 51-035; 3M Scotch Dimensional Foam Tape]

Thank you for joining us during our our 8-part "Radiant Neon" series!


Radiant Neon, 7 of 8: Jill

Put on those sunglasses...as we dream of the bright sun and warm temps of summer, we're going bold and bright in the Studio with Tsukineko's Radiant Neon Inks.  Join us over the next several weeks as we share eight projects featuring these incredible inks with fun techniques and happy color combos!

Additional Imagine Crafts / Tsukineko Inspiration on their FACEBOOK PAGE

What are my two favorite Radiant Neon ink colors?
Definitely Electric Purple and Electric Coral!
Using Penny Black's T for Transparent set Puzzle Parts, I stamped my backgroud using VersaFine Onyx Black ink and Radiant Neon Electric Coral and Electric Purple inks.  There's nothing like a touch of bright color to bring a background to life.  My tag was colored using ShinHan Art Touch Twin markers in coordinating colors.  I embellished the tag with a couple Penny Black Creative Dies, 51-035 Dots and Swirls cut from vellum and 51-027 Triple Banner. Floral image by Penny Black, 40-311 Poppy Trio. 

A quick note for our stamping friends...

Hi friends! As you get ready to start your week, we wanted to be sure to let you know about a fun week of inspiration happening on the Penny Black blog...

In addition, the folks at Penny Black are also offering a giveaway.  
You can find the Penny Black Facebook page HERE.
Note: If you're not on Facebook, there is also a giveaway on the PB blog.
See you soon with more bright STUDIO fun!


Out & About with Jill and Elizabeth

We've been having fun as we are getting inky...
...on the Penny Black blog.
And guess what we've created this week?
Masculine projects!
CLICK HERE TO VIEW THE PB&J VIDEO

CLICK HERE FOR COMPLETE DETAILS AND INSTRUCTIONS.


Radiant Neon, 6 of 8: Jill

Put on those sunglasses...as we dream of the bright sun and warm temps of summer, we're going bold and bright in the Studio with Tsukineko's Radiant Neon Inks.  Join us over the next several weeks as we share eight projects featuring these incredible inks with fun techniques and happy color combos!
Additional Imagine Crafts / Tsukineko Inspiration on their FACEBOOK PAGE

One thing I especially love about the Radiant Neon Inks is how seamlessly they blend with Tsukineko's other inks.  On today's card I've paired Electric Yellow Radiant Neon Ink with VersaMagic Turquoise Magic, Mango Madness, and Sea Breeze inks along with Memento Luxe Lilac Posies ink.
I inked my Penny Black Creative Die Pennant with the various ink colors.  Once dry, I also stamped the turquoise pennants with Penny Black Paisley Outline using Memento Teal Zeal ink.  The multiple rows of pennants were layered onto my card in addition to Penny Black Creative Dies Pinwheel and Leaves, also colored with coordinating Tsukineko inks. 

Radiant Neon, 5 of 8: Elizabeth

Put on those sunglasses...as we dream of the bright sun and warm temps of summer, we're going bold and bright in the Studio with Tsukineko's Radiant Neon Inks.  Join us over the next several weeks as we share eight projects featuring these incredible inks with fun techniques and happy color combos!
Additional Imagine Crafts / Tsukineko Inspiration on their FACEBOOK PAGE

Grab your paintbrushes....and let's watercolor with Radiant Neon ink!

To begin, ink Poppy Trio (Penny Black) in Claret and Jet Black StazOn and stamp on watercolor paper.  Press the Radiant Neon ink pads on an acrylic block to create swatches of ink.  Lift the color from the block with a damp paintbrush and color the flowers.  "Fussy cut" the flowers with scissors.  For embellishment, spray the flowers with Sparkle Sheer Shimmer Spritz and dab tiny drops of Goosebumps textural spray in the centers.  
Die cut the swirl border from white cardstock and adhere to a small rectangular piece of forest glen cardstock.  Tuck the trimmed flowers behind the accent strip and attach to a Les Petites card base with dimensional foam tape.  Stamp the sentiment in black and round the top right corner.

[Supplies: Imagine Crafts/Tsukineko: Radiant Neon (Electric Yellow, Electric Green, Electric Pink, Electric Coral), StazOn (Jet Black, Claret), Onyx Black VersaFine, Psst Shimmer Spritz (Sparkle), Goosebumps; Penny Black: Les Petites 90-001, Poppy Trio 40-311, Special Wishes 30-229, Dots & Swirls Creative Dies 51-035, Forest Glen 07-001 Mix & Match Cardstock; Canson Watercolor Paper; Scotch 3M Dimensional Foam Tape; Corner Rounder]


Radiant Neon, 4 of 8: Elizabeth

Put on those sunglasses...as we dream of the bright sun and warm temps of summer, we're going bold and bright in the Studio with Tsukineko's Radiant Neon Inks.  Join us over the next several weeks as we share eight projects featuring these incredible inks with fun techniques and happy color combos!
Additional Imagine Crafts / Tsukineko Inspiration on their FACEBOOK PAGE

Welcome and a Sunshiny Hello!

I am thoroughly enjoying the creaminess of Tsukineko/Imagine Crafts’ Radiant Neon inks.  They are a dream to blend!

 Today’s design technique uses Brushstixs for the color blending application. 

Penny Black’s Sunny Hello was stamped several times on white cardstock in Onyx Black VersaFine and heat embossed with clear powder.  Brushstixs were tapped on the Electric Yellow and Electric Orange Radiant Neon ink pads to pick up the color.  The ink was applied with a flicking motion.  This helped feather the color from the center of the flower to the tips of the petals.  The center of the flower was colored using “circular” blending to achieve a deep, solid hue.  The layers were then “fussy” cut and assembled using dimensional foam tape.


I love the classy look of gray and black paired with yellow so I designed accents in those tones to complement the flower.  The decorative paper is Penny Black’s gray Mix & Match Cardstock stamped with Paisley Outline in London Fog Memento.  The same color cardstock was used for the washi tape; however, the ink was switched to Onyx Black VersaFine when stamping “Embellishments” and was then heat embossed with clear powder.  The sentiment (Sunny Hello) was also stamped in Onyx Black VersaFine and heat embossed. 

[Supplies:  Imagine Crafts/Tsukineko: Radiant Neon (Electric Orange, Electric Yellow), London Fog Memento, Onyx Black VersaFine, Brushstix, Clear Embossing Powder; Penny Black: Sunny Hello 30-230, Paisley Outline 40-048, Embellishments 30-161, Mix & Match Cardstock – 01-001, 01-002; 3M Scotch Dimensional Foam Tape]

Wishing you a Sunshiny day....


Radiant Neon, 3 of 8: Jill

Put on those sunglasses...as we dream of the bright sun and warm temps of summer, we're going bold and bright in the Studio with Tsukineko's Radiant Neon Inks.  Join us over the next several weeks as we share eight projects featuring these incredible inks with fun techniques and happy color combos!
Additional Imagine Crafts / Tsukineko Inspiration on their FACEBOOK PAGE

For today's neon card, I wanted my neon colors to really POP against a dark background...
I began by inking white cardstock with Electric Green ink using an ink blusher.  Once dry, I stamped Penny Black, 40-283 Floral Tapestry, using StazOn Midnight Blue ink.  I love the way these two inks mixed on the solid areas, giving the background additional texture.  Next I used Penny Black's Creative Die Pinwheel to cut a "window" on the background.  The butterfly (Penny Black Creative Die 51-010 Delicate Wings) was colored with a combo of Memento Luxe Lilac Posies ink (bottom butterfly layer) and Electric Pink (top butterfly layer).  Some ribbon and twine from May Arts finishes things off along with my die cut sentiment (Penny Black 51-038 Hooray).  I really love the way the Radiant Neon colors look paired with darker Tsukineko inks...I just might have to try that again!

Design Memory Craft Blog Hop with Jill

Welcome, my friends, to the Studio!
Today I'm honored to be part of a Faber-Castell Design Memory Craft blog hop as we team up with Ice Resin.
This was my first time working with Ice Resin and it was sooooo fun!
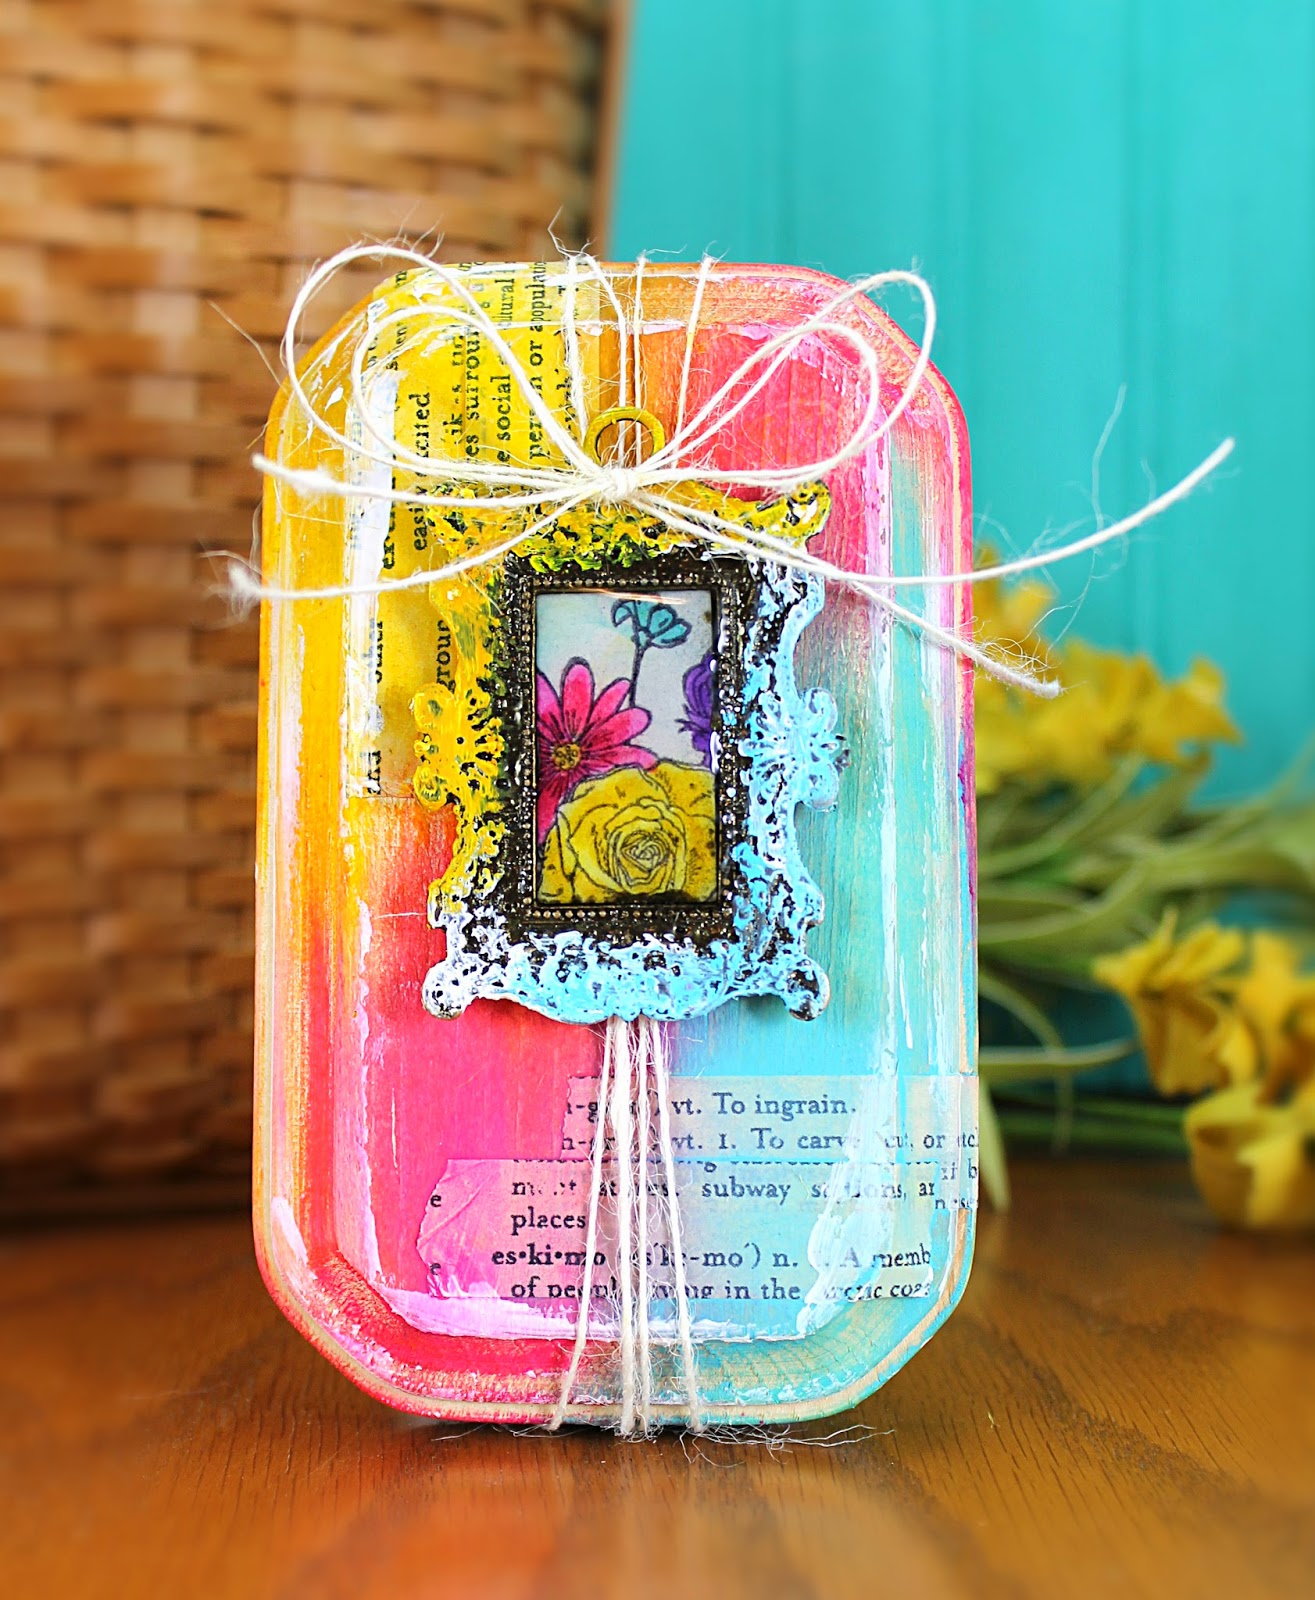
For my mixed media creation, I first stamped (Penny Black 30-215 Garden Blooms) and colored my inner bezel paper using PITT® Artist Pens.  Once this was adhered, I added Ice Resin Medium and Relique Tarnished Bronze powder to the outer edges of my bezel.  I used my heat gun to melt the powder.  Then I added Gesso and Gelatos® (Snow Cone, Lemon, and Butterscotch) to the edges.  Finally, I added the resin to the interior of the bezel and allowed it to dry overnight.  
To create my "plaque" I simply added lots of washi tape and Gelatos® to the wooden, precut board (uber-cheap at my local craft store), blending with my fingers as I went. I also added a touch of Gesso to brighten things up.  Finally, I embellished with twine and added my bezel to the"plaque" using dimensional adhesive.
PRIZES!
The generous folks at Ice Resin and Faber Castell Design Memory Craft have a fantastic prize package...
...simply leave a comment to be entered to win.
The blog hop projects will end on Friday but you have until midnight Eastern time on Sunday, May 18 to post a comment. Winners will be announced Monday, May 19.  Two winners will win a Designing with Gelatos kit OR a  prize pack from Ice Resin (a Resin Plunger, a Bezel, Medium and a Relique). 
HOP, HOP, HOP
Now click HERE to visit the blog of the talented Kathy Cano Murillo for more inspiration!

Guesting at StampNation

We're poking our inky fingers out of the Studio today and are honored to be making a trip over to StampNation as special guests!  If you're already a member, be sure to check out the Penny Black sponsored challenge at StampNation and you'll find the full reveal of our cards.  Here's a little peek...
 

And if you're not a member of StampNation,
you can find more about joining HERE.

Out & About with Jill and Elizabeth

Throughout this week, we will be...


...celebrating a great new release over on the Penny Black blog!
Here's a little peek at the fun we had in the Studio creating samples with these new stamps and Creative Dies.

CLICK HERE FOR THE FULL REVEAL 
(throughout the week of 5/5 through 5/10)